
Bikepacking Repair Kit
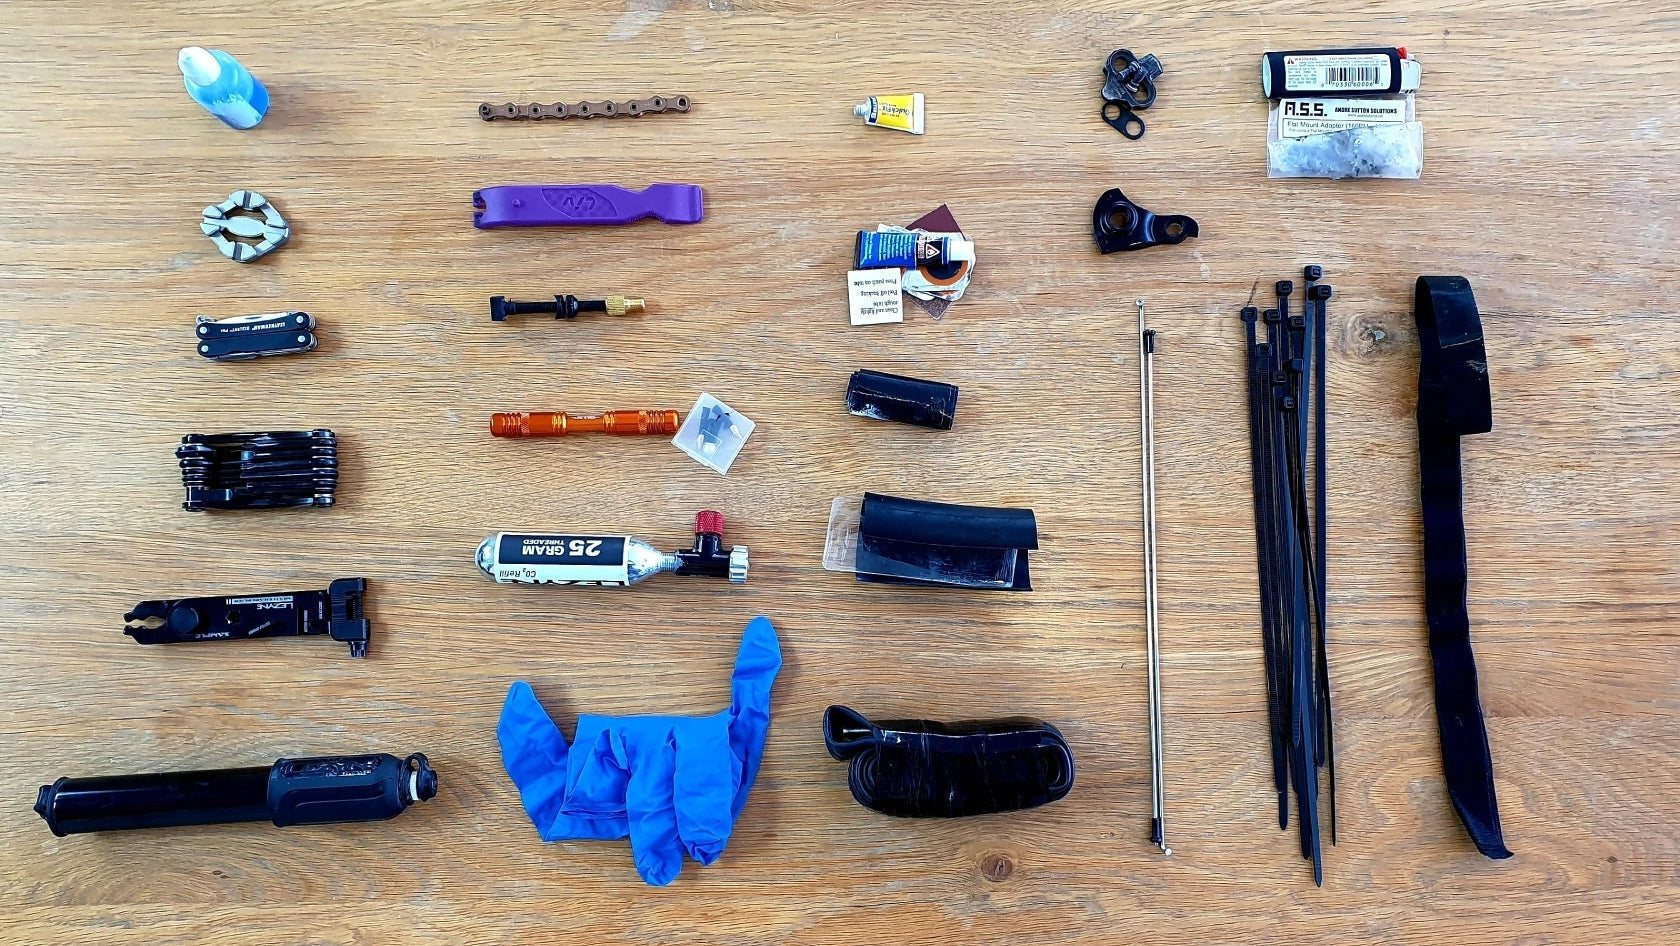
Let's build your ultimate bikepacking repair kit! In this blog I’ll take you through my complete kit that I take on multi day, 1000+ km rides. This is my mechanical lifeline, and has got me through some real binds in the middle of nowhere.
I have selected these tools with knowledge from working at Pushbikes, listening to others experiences, having been a mechanic myself, and learning first hand out on the trail. Before you keep reading my complete bikepacking repair kit I’ve got 4 important pieces of advice,
- Know your tools. It’s super important to know and understand your tools, exactly what they're going to do, how they're going to help you and that they fit the multitude of different sized bolts on your bike.
- How to use them. There's no point taking anything unless you know how to actually use it, and that includes having done it yourself. Watching YouTube videos on how to fix punctures or repair a broken, is not the same as having actually done this yourself. It makes a huge difference out on the trail when you'll be under a little more pressure. Pushbikes runs hour long, hand on training courses to help you get more confident with your bike.
- Know your bike. Your bike has a multitude of different parts on it, get confident by understanding each and everyone and how they operate.
- Don't be a weight weenie. This is only going to cost you if and when something actually goes wrong. The tools I have selected are more ‘individual tools’, there's no point taking a multi-tool with a multitude of tiny parts/tools that just make life harder and cause frustration on the trail. My entire tool kit is under 1kg of weight, which is about 10% of my total pack setup of 10-11kg.
Watch the full video below for an in depth explanation, I’ve also included the list of tool and links to make it easier for you to find them.
The Must Have Tools List
Lezyne Pocket Drive HV Pump
One of the best pumps I’ve used in recent years, the HV (high volume) version is great for bigger volume 700x40 through 700x50c gravel tyres, the pull out hose securely connects with the valve and makes it easy to pump from any angle. It also has rubber end covers to keep the dirt out. View here.
Lezyne Multi Chain Pliers
One of my favourite tools, this safely stores 2 spare chain links, including a chain breaker, rotor straightener, valve core tool, bottle opener and chain pliers if you're needing to undo a joining link. Best of all, it's easy to use and fits well in your hand when using the chain breaker. View here.
Lezyne RAP II 12 Multi Tool
A good solid multi tool with all the sized allen keys I need, 2mm through 8mm Hex, T10 through T30 Torx and both Phillips and Flathead screwdrivers. View here.
8mm Allen Key
If your bike has a self extracting crank bolt or specifically a SRAM crank, it's a good idea to take a decent sized allen key to be able to remove the crank if necessary, normally an 8mm. Your multi tool will not provide enough leverage.
Leatherman Squirt PS4
Best investment and most used tool I have in my kit, both the pliers and scissors have been regularly used, it also features a knife, bottle opener, file and both a flat and phillips screwdriver. It's also just 5.4 grams! You can buy this from our friends at Further Faster.
BBB Spoke Key
You’ll be thanking yourself for carrying a proper spoke wrench, they’re a whole lot easier to use and won’t round or slip on the nipple like ones included on multi tools. This tool has all 3 common nipple sizes.
Chain Lube and Cloth
This goes without saying, you’ll be regularly lubing your chain on multi day rides, along with giving it a quick clean with a piece of rag. There are a large number of lubes out there, my favourites that I have found to last the distance is MucOff Hydrodynamic or failing that I’m a fan of most wet lubes, both these will see you through 200 km+ days. I also carry mine in a small bottle which you can get from Storage Box or the likes, simple fill from your larger bottle at home.
Latex Gloves
For the weight and size these are well worth adding to your kit, if you are fixing a dirty chain or something similar it is nice to have clean hand afterwards! Most first aid kits will also contain gloves in them, so check in yours. We have these at the Pushbikes shop, just come in and ask nicely.
Lezyne Co2 Cartridge
Carrying a Co2 (plus inflator) is a must if you’re running a tubeless setup, you’ll never bead a tubeless tyre onto the rim with a standard mini pump. The size of your tyre will depend on the size of the Co2 you’ll need. I travel with the larger 25g running 700x45 tyres which works perfectly, I also have a controllable inflater (below) which means I don't have to empty the entire Co2 in one use.
BBB Co2 Inflator
The BBB is a good solid inflator which screws onto the valve for a more secure connection, it also has a controllable head meaning you don’t have to use the entire Co2 in one use.
Dynaplug Racer Plug Tool
One of the nicest and lightest plug tools on the market, CNC machine, holds 2 plugs ready to use, one in both ends. I also carry a few more spare plugs just in case I have a larger gash in the tyre and it needs multiple plugs to seal. View here.
Tubeless Valve and Presta to Schrader Adapter
Carrying a spare valve is a great backup if you need to replace the entire unit or just the valve itself. I have also attached a SV connector onto the end so I can inflate my tyres at a service station.
Tubeless Tyre Lever
One good solid tubeless tyre lever should be enough to help you get your tyre off and back on, make sure you test your fit up first to ensure 1 is enough!
Extra section of chain
I carry a spare section of chain, which is the left over links from a new chain. This is a great backup if you’ve got multiple damage links and need to replace a section of chain. As mentioned I also have 2 x spare joining links, plus the one already in the chain. Next time you have a new chain fitted, ask for the leftover to put into your kit!
Spare Tube
Carrying a spare tube goes without saying, this is my backup in case a tubeless plug repair hasn’t worked or I have a bigger cut in the tyre. I have found 1 x spare tube to be more than enough along with carrying a puncture kit as a backup. I have also wrapped the tube in half a role on insulation tape to protect it and to have this in my kit.
Tyre Boot Repair - Plastic and Tube
If you’re unfortunate to get a cut or larger hole in your tyre, simply putting a new tube into this isn’t going to work. You’ll need to insert a layer of protection between the tube and inside of the tyre. I carry a piece of plastic and a cut up tube, to act as a sleeve and protect the tube. Park Tools also sell a tyre boot kit, however I have found this to be a more robust option. Keep your old tubes to cut up and find a nice smooth bottle to cut a piece of plastic out of.
Puncture Repair Kit or and Glueless Repair Kit
Along with a spare tube, this is a must and acts as a backup if you’ve already used your tube, or tubes. The patched can also double up as a tyre boot repair (above) if it's a smaller cut. I carry both glued and glueless, glued definitely provides a better repair vs glueless which is far quicker.
Super Glue
It's a handy option to have in your tool kit, in case your sole comes unglued from your shoe, or something similar that can be fixed quickly to get you through to the next stop in civilization. You can buy this from any supermarket or the likes.
Spare Spokes
If you break a spoke, it's going to need to be replaced with all the extra weight and pressure on your bike. It's important to note that there are different sizes front to back and even side to side so make sure you're caring for all the different lengths. Another note is to ensure you have the tools to get into the hubs to replace the spoke, this will require the rotor and cassette being removed. We have all different spoke lengths on hand in all Pushbikes workshops.
Derailleur Hanger
Handy to have in your bag of tricks, my personal opinion is that if you're in need of replacing the hanger then most likely you’ll also need to replace your derailleur as this will have been damaged. Chances are though when you are able to find the closest bike shop, they’ll be unlikely to have a replacement hanger due to the multitude of different designs. These can be purchased or ordered in store.
Spare Cleat
I’ve heard so many stories about people losing cleats or cleat bolts that it’s made me carry a spare cleat, with bolts and washers. They are easy to fit and replace so you can continue to efficiently turn the pedals.
Zip Ties
Zip ties can be used for many different applications, they are a must for any tool kit. I have recently used these for securing a broken shoe together, wrapping around a tyre which was torn and holding a mount on my handlebars which broke. You can buy these from just about anywhere, including Pushbikes.
Lighter
Just in case I find that my cooker won't ignite and I don’t have to eat a cold dinner.
Spare Bolts
I have a few spare replacement bolts from various parts throughout my bike, from derailleur pulley bolts and washers, bottle cage bolts, stem bolts, rotor bolts, and seat rail clamp bolts. With all the extra weight your packs add to your bike, you’re going to have a breakage at some point.
Velcro Straps
Great idea to carry some spare straps in case you have a failure, or you need to attach something to your bags.
Insulation Tape
Has various applications, I have wrapped this around my tube for protection and to minimize the space it takes up. You can buy this just about anywhere.
Duct Tape
What good tool kit doesn’t have duct tape? It's stronger than installation tape and has 101 uses! Like insulation tape, you can buy this just about anywhere.
The Maybe List
Spare Brake Pads
If you’re going to carry spare disc pads you’ll need to ensure these are the correct type for your brakes. I personally don’t carry these, opting to run metal pads instead, these are more robust and give better wear. I’d always be ensuring I have new or near new pads in my bike before setting off on a multi day adventure. View all pads here.
Separate Allen Keys
If you can afford a few extra grams, carrying individual allen keys vs a multi tool is a great idea. These are easier to use, will fit in places multi tools don’t, they do take up a little more room in your bag.
Tubeless Sealant
Carrying extra sealant on extended multi day rides is a great idea, if you’ve suffered a flat or have plugged your tyre and need a little extra sealant to create a seal. You can buy this in a 60ml bottle which is enough to fill a tyre, or top up both.
Let us know you thoughts
Have I missed your favourite tool on my blog? Let me know in the comments below, I'm always keen to learn new tips and tricks to help not only myself but everyone enjoy their experience!


Cheers for that…you seem to carry a few bottle openers on your trips, does your wife know this? 🤣
I use the BBB Dual pressure pump for my tyres and shocks on my Hardtail, it has a pressure gauge and a release valve, because it is a slightly larger size it allows a bit more volume and I have been able to pump up tubeless tyres on a number of occasions (a bit of technique as well). I notice obviously you won’t require a shock pump on your GB though.